- Licensing
- Installation
- Quick Start
- About Quick Start
- Creating and Naming a New Project
- Creating and Naming New Modules
- Setting up the Start Module
- Returning to the Call Flow View and Checking Relations
- Setting up a List Module
- Recording and Using a Library Vox
- Setting up a Hangup Module
- Setting up the Global Module
- Setting Up the Global Yes/No Module
- Tutorial
- Section One:Basic Functions
- Creating a New Project
- Naming Your Project
- The Call Flow View
- Adding Modules to the Call Flow View
- Naming Modules
- Opening a Module
- The Start Module
- Recording a Quick Vox
- Editing Properties from the Properties Table
- Setting up a Goto
- Returning to the Call Flow View
- Double Checking Gotos Using Relations
- Using the Transfer Module
- Recording a Library Vox
- Using a Library Vox
- Using the Hangup Module
- Section One Review
- Creating and Naming a New Project
- Opening an Existing Project
- The List Module
- About Grammar
- Adding Concepts and Phrases to the Grammar List
- Notes on Scripts and Grammars
- Adding Phrases to an Existing Concept
- Setting up a Confirmation
- Setting up a Response
- The Phrase Library and the Backus-Naur Form
- The Multilevel Module
- The Global Module
- No Input, No Match & Error Handling
- The Global Yes/No Module
- Section Two Review
- Creating and Naming New Modules
- Section One:Basic Functions
- Help
- VB Interface
- Advanced
- Call Handler
- FAQ's
Step By Step
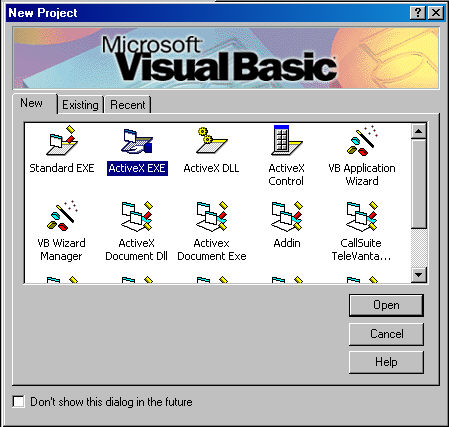
Open Microsoft Visual Basic. From the New Project window select the ActiveX EXE and then Click "Open".
Next we will need to add in the references to the project components.
-
Click on the Project menu and select "References". This will cause the References window to display.
We will need to add two references to this project. To add a reference you will check the box next to the name
in the list. The two references you will add are:
LVCA_Link and SDIS_Custom_Call
- After these two items are checked click on OK.
- Now we have a Project with a single class in it.
- Lets rename this project now. In the Project window click on the "Project1" and then change the name of the project in the properties window to TestLVCA.
- Now change the name of the class to DefaultModule using the same procedure. (this name was picked arbitrarily.)
- Please save your project to an appropriate location.
-
In this example the purpose of the Default module is to handle the events of the call. To do this it
must implement the class SDIS_Custom_Call.Module. This accomplish this you will first need to add the
following line to the top of the class: Implements SDIS_Custom_Call.Module. The next step will be to
add several required functions and procedures:
- Public Sub Module_CallStart(ByRef LVCA As LVCA_Link.CustomCallActions)
- Public Sub Module_CallEnd(ByRef LVCA As LVCA_Link.CustomCallActions)
- Public Sub Module_ModuleEntry(ByRef LVCA As LVCA_Link.CustomCallActions)
- Public Sub Module_ModuleAfterDecode(ByRef LVCA As LVCA_Link.CustomCallActions)
- Public Sub Module_ModuleAfterConfirm(ByRef LVCA As LVCA_Link.CustomCallActions)
By adding these functions to the class we fulfill the implementation requirements.
- Save your Project.
Next we will create our project which we will attach this Active X executable to.