- Licensing
- Installation
- Quick Start
- About Quick Start
- Creating and Naming a New Project
- Creating and Naming New Modules
- Setting up the Start Module
- Returning to the Call Flow View and Checking Relations
- Setting up a List Module
- Recording and Using a Library Vox
- Setting up a Hangup Module
- Setting up the Global Module
- Setting Up the Global Yes/No Module
- Tutorial
- Section One:Basic Functions
- Creating a New Project
- Naming Your Project
- The Call Flow View
- Adding Modules to the Call Flow View
- Naming Modules
- Opening a Module
- The Start Module
- Recording a Quick Vox
- Editing Properties from the Properties Table
- Setting up a Goto
- Returning to the Call Flow View
- Double Checking Gotos Using Relations
- Using the Transfer Module
- Recording a Library Vox
- Using a Library Vox
- Using the Hangup Module
- Section One Review
- Creating and Naming a New Project
- Opening an Existing Project
- The List Module
- About Grammar
- Adding Concepts and Phrases to the Grammar List
- Notes on Scripts and Grammars
- Adding Phrases to an Existing Concept
- Setting up a Confirmation
- Setting up a Response
- The Phrase Library and the Backus-Naur Form
- The Multilevel Module
- The Global Module
- No Input, No Match & Error Handling
- The Global Yes/No Module
- Section Two Review
- Creating and Naming New Modules
- Section One:Basic Functions
- Help
- VB Interface
- Advanced
- Call Handler
- FAQ's
Recording a Quick Vox
To make a greeting, we need to add a Vox to the list of Actions. A Vox is an Action that plays a sound file. You can record Voxes in your own voice, or have somebody record them for you.
To add a Vox to the Main:
-
Right click on the word "Main" and select "Add Vox". A Vox icon will appear below the
word "Main" and above the Goto.
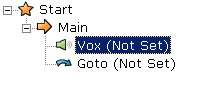
- Click on the Vox icon so that it is highlighted in blue.
-
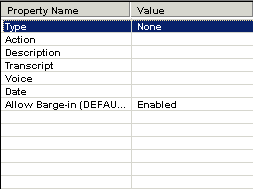
On the right side of the screen you?ll notice an area that is filled with a three-column table. This is the
Action Properties Table, and is where you edit each individual command in the Main. Do not confuse this table
with the Properties Panel in the lower left corner. The Properties Table directly corresponds with the open
Module. Double-click on the "None" cell in the Properties Table
- A yellow dialog box will pop up with two options for the Vox type. Double click on "Quick" to choose a Quick Vox. A Quick Vox is one that you can record immediately in the Properties Table, and is what you?ll choose for the Voxes that you use only once in your Speech Application.
-
Double click on the upper case word "RECORD"in the Properties Table. This will open up a "New Audio
Item" Recording Box A box in which you can record a Vox and fill out its Voice, Description, and
Transcript information. which you can use to record your Vox files. The Recording Box looks like this:
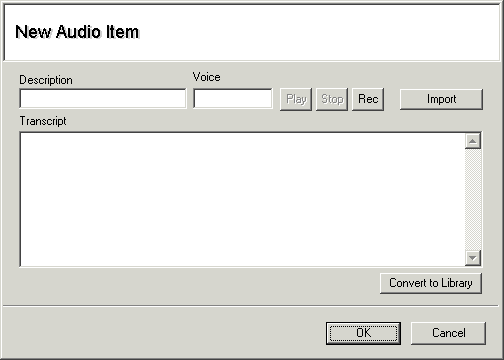
- Fill out the fields in the Recording Box as follows:
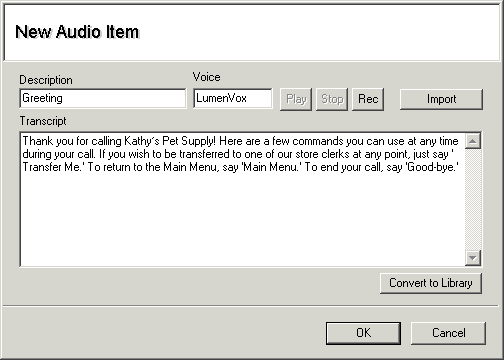
- In the Voice field, type your name or your initials. This will let you keep track of which person has recording each Vox file. This information is useful if you eventually want to re-record all the Vox files in someone else's voice, or if more than one person works on developing your Customer Service system.
- In the Transcript field, field, type the following: Thank you for calling Kathy's Pet Supply! Here are a few commands you can use at any time during your call. If you wish to be transferred to one of our store clerks at any point, just say "Transfer Me". To return to the Main Menu, say "Main Menu". To end your call, say "Good-bye".
Typing out your transcript in full will make recording easier for you, especially if you ever decide to re-record your Vox files later. Your recording box should look something like this:
- Once all the fields in the recording box are filled out, begin recording by pressing Rec. Speak into your microphone. When you are done, press Stop. You can review your recording by pressing Play. If you aren?t happy with your recording, you can redo it by just pressing Rec again and pressing Stop when you are done.
- When you are satisfied with your recording, press the OK button. This will close the Recording Box.
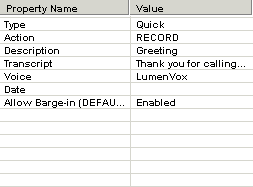
-
Notice that the Voice, Description, and Transcript fields are now filled out in the Properties Table.
Save your changes by clicking on File > Save.