Transcriber Reference
The Transcriber is used to write down every word in a call. The Grammar Tester uses these transcripts in evaluating how well a speech engine is interpreting what users are saying. Good transcripts are an important part of properly tuning a speech recognition application.
The Transcriber is launched from the Speech Tuner's main window by selecting Launch Transcriber after a call database is loaded.
The Transcriber Window

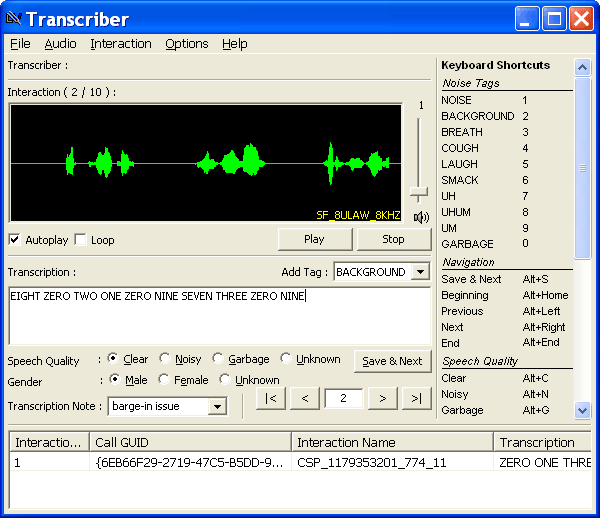
The Transcriber is broken into three general areas. The Audio Display shows the waveform for the current interaction. The Transcription Entry area controls the transcription information that will be saved with the current interaction. The Transcription Log shows what transcription information has been updated in the current session.
You may import transcripts by selecting Import Transcript from the File menu.
Along the right side of the screen is a list of keyboard shortcuts. These can be toggled on or off by choosing Shortcuts from the Options menu. You may also toggle warnings (e.g. the missing grammar warning) by selecting Report Warning from the Options menu.
Audio Display
The top of the Audio Display shows the current interaction number out of the total number of interactions loaded.
The main portion of the display is a waveform of the audio. Next to the waveform is a volume slider; adjusting it controls the volume of the audio that is played.
Below that are controls for the audio. On the left, the Autoplay checkbox controls whether the Transcriber will play the interaction audio automatically upon loading a new interaction. Checking the Loop checkbox will cause the Transcriber to play the audio in a continuous loop. On the right side, the Play button will play the audio and the Stop button will stop it. Audio can also be played and stopped by using the Audio menu.
Transcription Entry
The core of the Transcriber is the Transcription Entry area. The Transcription field is where the actual transcripts are entered. Transcripts should be a word-for-word accounting of what the caller said during the current interaction. Just above this field is the Add Tag drop-down menu. Selecting an entry from the list inserts a noise tag into the transcript. Noise tags are inserted at the cursor's position.
Red transcription text means the text was generated automatically by the Transcriber when the interaction was loaded. The Transcriber attempts to automatically generate text where no transcripts exist. If a record with red text is saved, the Transcriber will convert the automatically generated text to a permanent transcript. Users should always check automatically generated transcripts and correct any errors before saving.
On the left under the Transcription field is a set of radio buttons that allows transcribers to indicate the clarity of the audio and another set that allows them to set the gender of the speaker.
To the right are navigation controls that allow transcribers to move between the loaded interactions:
-
 Saves the current transcript and moves to the next interaction.
-
 Moves to the first transaction.
-
 Moves the previous transaction.
-
 Moves to the next transaction.
-
 Moves to the last transaction.
The navigation controls are also accessible through the Interaction menu.
Transcription Information
Transcribers can save extra information associated with an interaction as part of the transcript:

The Speech Quality radio buttons allow the transcriber to flag the quality of audio.
Gender denotes the gender of the speaker.
Transcription Notes are used to add custom information about the particular interaction. These are useful when filtering data in the Main Tuner Window, as they can be filtered against. For instance, if you wanted to keep track of interactions that were incorrect because of barge-in settings, you could add a note for each such interaction and filter only on those.
Transcription Log

The log keeps track of transcripts saved in the current session. The fields are as follows:
| Label | Meaning |
|---|---|
| Interaction # | The number of the interaction. |
| Call GUID | The GUID of the call. |
| Interaction Name | The name of the interaction. |
| Transcription | The text of the transcript. |